
Classify by Statistics PCT Overview
Classify by Statistics is a Point Cloud Task in LP360 that can be created by selecting the “Add Task…” option in the Point Cloud Tasks Manager. It is primarily useful for general data thinning – especially useful for very dense data such as that derived from imagery (dense image matching, DIM, data). For example, you can set the grid size to 2 meter and choose a median selector, such as one point. You will then have a 0.5 points/m2 point cloud based on the median points from the dense data. Another example, I can set the grid size to 1 meter and choose a median selector, two points. I will then have a 2 points/m2 point cloud based on the median points from the dense data. This particular Point Cloud Task Type is also used for the TrueView - Ground Classification, Create Seed Surface PCT.
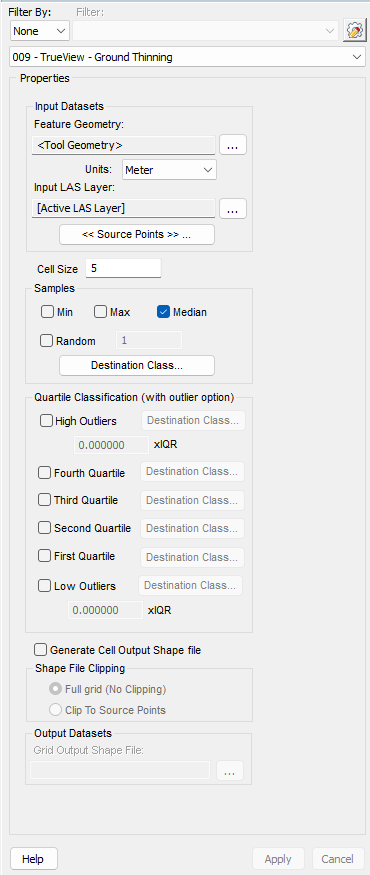
Ground Thinning - Classify by Statistics PCT
The task creates cells of size 'Cell size’ by 'Cell size'. For each cell it calculates the statistics on the Z value (elevation). It then keeps the ones you check:
| Min | Point with lowest Z value; if more than 1 point with lowest Z picks a random one to keep. |
| Max | Point with highest Z value; if more than 1 point with highest Z picks a random one to keep. |
| Median | Point with median Z value. |
| Random | n points selected at random that are not the Min, Max or Median points if those options are selected. |
So if you set the task to keep Min, Max, Median and 5 random points and a cell size of 1 m you will end up with 8 ppsm in every cell where there is at least 8 points. For cells with less than 8 points, you will keep them all. It is a very good way to thin dense data sets. In the US we often set these to generate 2 ppsm or 8 ppsm clouds since these values correspond to the USGS quality level densities for airborne lidar.
When running this tool, it is very important to consider your Source Points and Destination Class for the specific task you are looking to accomplish. For descriptions of all parameters in this PCT, please visit the Classify by Statistics Point Cloud Task Page. For additional information on using the quartiles in your classification, please visit the Classify by Statistics - Quartile Classification Settings page.
General Workflow for Data Thinning
These steps are for thinning a point cloud that hasn't been classified yet can be seen below:
- Open the Point Cloud Task Manager
located either in the Table of Contents or (in v2025.2 or newer) on the Point Tasks ribbon.
- Click the Add button to create a new task.
- Task Type: Classify by Statistics
- Task Name: Thin Data (or another name you would prefer)
- Task Description: Always be sure to give a unique description to any new tasks you create.
- Make sure you have the LAS layer you want selected as the Active LAS Layer (Single LAS Mode
is very helpful when you have multiple LAS layers in a project)
- Open the "Thin Data" PCT you created (Classify by Statistics)
- Be sure to check the I/O Manager (Input/Output dialog) that you have the correct out put location set. ALWAYS check the units you are working in. They should be the same as the units your project is in.
-
Feature Geometry: <Tool Geometry>
- This allows you to use all of the execution tools capable with this PCT on the Point Tasks ribbon
-
Input LAS Layer: [Active LAS Layer]
- This allows you to execute the PCT over different LAS Layers by just changing the Active LAS Layer.
- Cell Size: for this example, use 5. This can be adjusted depending on how thin you would like your dataset to be. Larger values equal thinner datasets. Smaller values equal denser datasets.
- Check the box next to Median and leave all other boxes unchecked (like in the example Ground Thinning PCT figure above)
-
Feature Geometry: <Tool Geometry>
- Open the Input Points Filter to make sure all points are included for thinning.
- In this case, all points should be in the 0 Created, Never Classified class.
- For datasets with ground classified, disable all classes by selecting Toggle All Off
then enable only 2 Ground Class.
- For datasets with ground classified, disable all classes by selecting Toggle All Off
- In this case, all points should be in the 0 Created, Never Classified class.
- Open the Destination Class and set it to a Reserved class.
- Most common class used is the 8 Reserved (Model keypoint) Class.
- Be sure to check the I/O Manager (Input/Output dialog) that you have the correct out put location set. ALWAYS check the units you are working in. They should be the same as the units your project is in.
-
Apply all the changes and execute By Active Layer
on the Point Tasks ribbon
- Once it is complete, use the Live View Filter
to visualize the newly classified points (8 Reserved (Model keypoint) class) in the Map View.
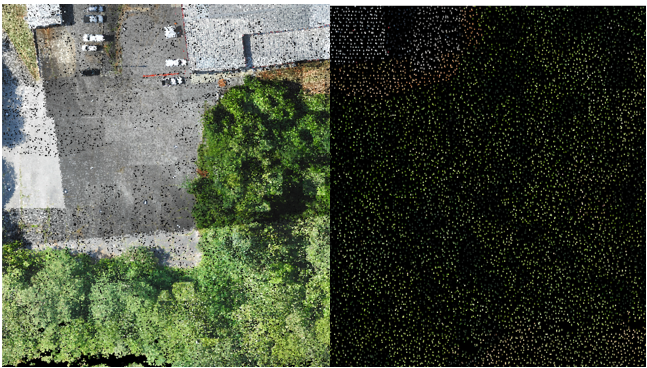
Original Point Cloud (left). Thinned Point Cloud (right)
Comments
0 comments
Please sign in to leave a comment.