
📌 Problem
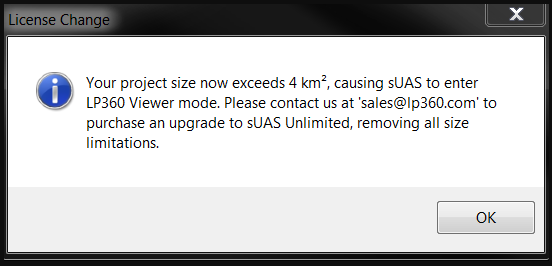
The user encounters an informational dialog, "Your project size now exceeds 10 km², causing active license to enter Viewer mode" or "Your project size now exceeds 4 km², causing sUAS to enter LP360 Viewer mode" when adding LAS files to the project or opening a project. Upon dismissing the License Change message, LP360 reverts to the Viewer License level, limiting functionality.
🔍 Root Cause
LP360 Drone and LP360 Land license levels limit the project size to 10 km². The legacy LP360 sUAS license level limited the project size to 4 km². If LP360 determines the project size exceeds this limitation, then LP360 reverts to the Viewer License level, limiting functionality. This may happen because:
- Your project size does exceed the area limitations of your license.
- Missing or incorrect coordinate reference information.
- Union of LAS file MBRs on a layer contain too much void area.
- LAS Output from Agisoft Ortho Mapping was not tiled.
✅ Probable Resolutions
-
Project exceeds the area limitation of the license
If the project size exceeds the size limitation for the license level, contact Sales@LP360.com to upgrade your license to LP360 Advanced or purchase an Unlimited addon license for LP360 Drone to remove the project size limitation. LP360 Drone subscription license users may purchase the Unlimited addon license directly from the LP360 Portal.
-
Missing or incorrect coordinate reference information
You know your project is smaller than 10km² for LP360 Drone, Land Basic or Land Standard (formerly 4 km² for LP360 sUAS), but you still receive this message. This issue is caused by the absence of spatial reference information in the header of the LAS file. If the units are not written to the header of the LAS file when it was created, LP360 will presume the units are meters. Hence, a project that is 4,000 x 4000 feet, will get interpreted as if it were 4,000 x 4,000 meters and exceed the project size limitation for the license level. The following steps explain how to correct this issue:
- Open LP360 and add the LAS files
. You will receive the message shown above. Select OK and LP360 will enter viewer mode.
- Open the Project Settings
dialog from the Project tab of the ribbon or File -> Project Settings and select the ellipses button to the right of Project Spatial Reference System (SRS) to access the coordinate system manager.
-
Choose the correct Spatial Reference System (SRS), aka Coordinate Reference System (CRS), for your project files. Once the horizontal and vertical SRS has been set for the project, select OK, and select OK again to dismiss these dialogs.
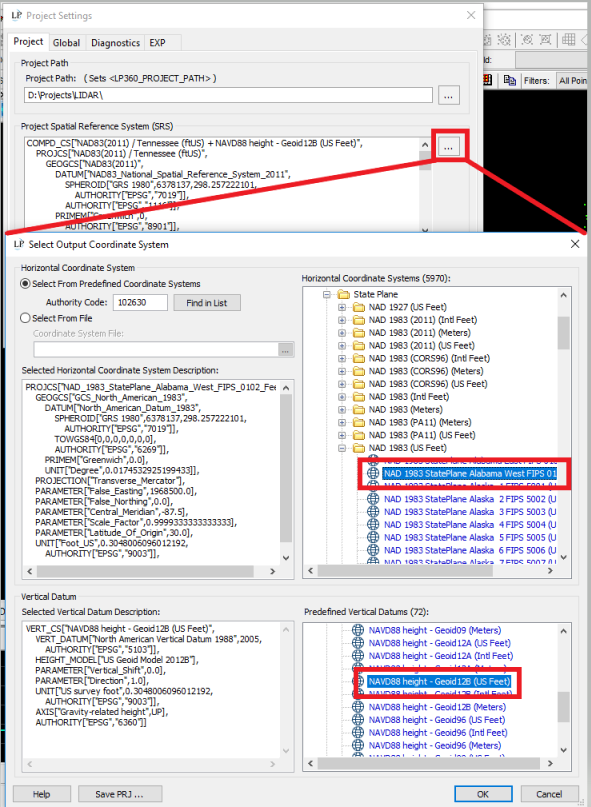
Figure 2: Project Coordinate Reference System (CRS) Picker -
Right-click on the LAS layer in the Table of Contents (TOC) and select the option to "Set layer SRS using Project SRS". Select yes to confirm.
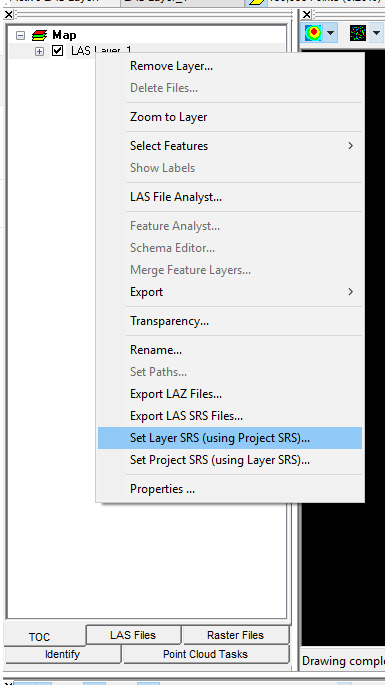
Figure 3: Set layer SRS using Project SRS - Save your current LP360 Project
from the Project tab of the ribbon or File -> Save Project As.
- Open LP360 License Manager
from the Support tab of the ribbon or File -> License Manager and "Check Out" the Drone license again.
- LP360 should no longer be in Viewer mode, and the correct project size should be displayed in the Project LAS Area (File -> Project Settings).
- Open LP360 and add the LAS files
-
Union of LAS file MBRs on a layer contain too much void area
The size is computed from the union of the MBR (minimum bounding rectangle) as written in the header of each LAS file for each LAS Layer. If you have an odd shaped area or a meandering corridor, and the data is all in a single LAS file, then you may encounter where the size will exceed the limit, even for a very small amount of data since the void area is included in the computation. LAS files generated by LP360 following our recommended workflows and best practice are usually by flight line or smaller tiles of data (after smoothing) so as to best avoid the inclusion of void areas in the project size computation.
To review the file layout for the Active LAS Layer of your project, enable the Display Boundaries
tool found on the Map tab of the ribbon to display the MBR.
-
LAS Output from Agisoft Ortho Mapping was not tiled
If you only encountered the size limit after running the Complete Job step for an Agisoft Ortho Mapping
(MfE or MfEC) job that included the generation of a point cloud, you may need to enable the Tile Point Cloud option under the Agisoft Ortho Mapping -> Advanced Settings -> Point Cloud Settings using a small enough size not to generate files that cover a large area, but have little data in them.
📬 Need Help?
If you're still stuck, please Contact Support for assistance.
Comments
0 comments
Please sign in to leave a comment.