The LP360 Sketch Tool is a custom ArcGIS™ sketch tool that adds custom functionality to the out-of-the-box ArcGIS sketch tool. The LP360 sketch tool operates the same as the ArcGIS sketch tool. The LP360 Sketch Tool is only available in LP360 for ArcMap. The LP360 Sketch Tool can use the ArcEditor snapping options in the same manner as the ArcGIS Sketch tool does:  However, using any of the ArcEditor Vertex tools, such as the reshape or edit vertices, will result in the z values of the vertices being incorrect and the conflation task will need to be run again. The best method is the use the z vertex options available within LP360 and explained below. How to Use the LP360 Sketch Tool
 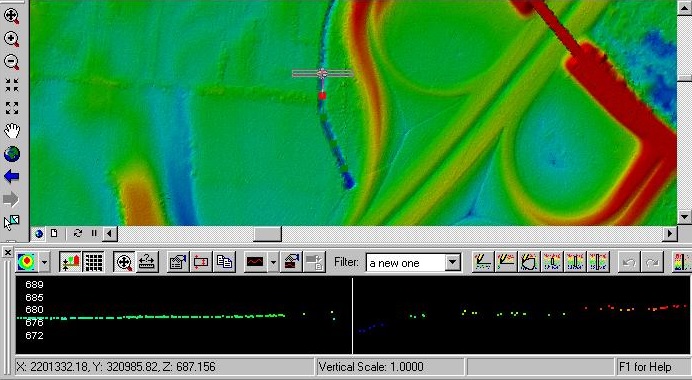 To turn on the integration with the profile, the user must press the "P" key while using the sketch tool. Once the sketch geometry has at least one vertex, the profile will then be placed perpendicular to the direction of the rubber band segment in the sketch geometry. The cursor location is displayed as a vertical white line within the profile viewer. To disable the profile tracking, press the "P' key again. If the profile viewer is not open when pressing the "P" key, it will automatically open the profile viewer (Note: some adjustment of the profile size may need to be made). To freeze the location of the profile and slide the cursor into a channel or on top of a bank, press the "S" key to toggle the sliding state of the sketch tool. When activated, sliding will freeze the profile and allow the user to slide the cursor along the profile. Sliding is deactivated upon pressing "S" again or left clicking in the map to commit the vertex to the sketch geometry. The following illustrates the use of the slide function to freeze the profile and to slide the cursor into the channel.
 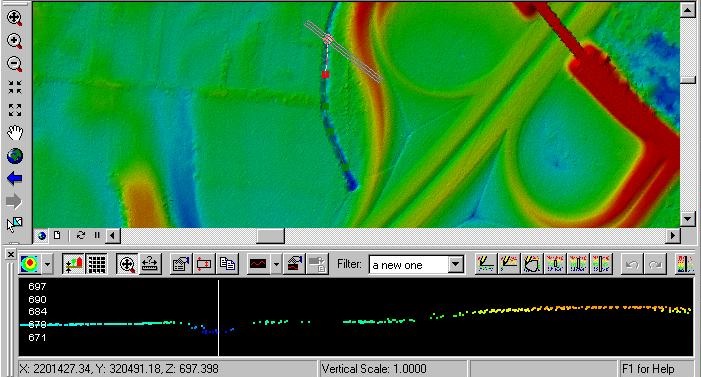 On-the-Fly Refresh While Digitizing ('F' Key) The LIDAR surface can be refreshed as the user digitizes a proposed breakline by pressing the 'F' key to toggle the on-the-fly refresh option. The on-the-fly refresh of the surface while digitizing can be useful in order to visualize the surface before committing changes to the LIDAR and feature databases. The following shows an example of using the on-the-fly refresh during the creation of a flat water body polygon.
 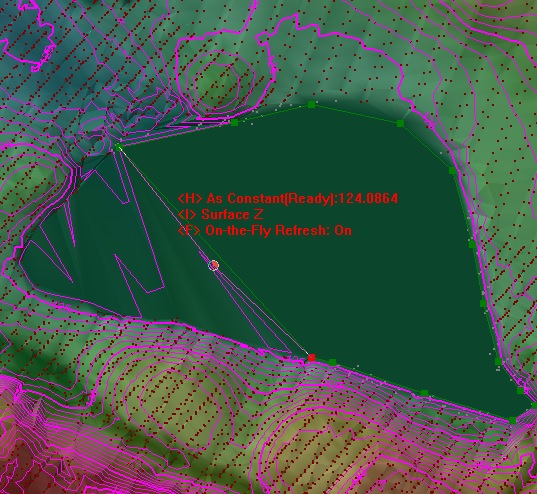 In the example above the user selected an on-the-fly refresh property to define the elevation that was used for the polygon during digitizing. The on-the-fly refresh setting may also be used with conflation methods such as downstream constraints for creating hydrology centerline features. The example below uses a combination of z locks (see discussion the Z Lock Option; 'L' key) and the on-the-fly refresh to visualize the surface before committing the centerline to the database.
 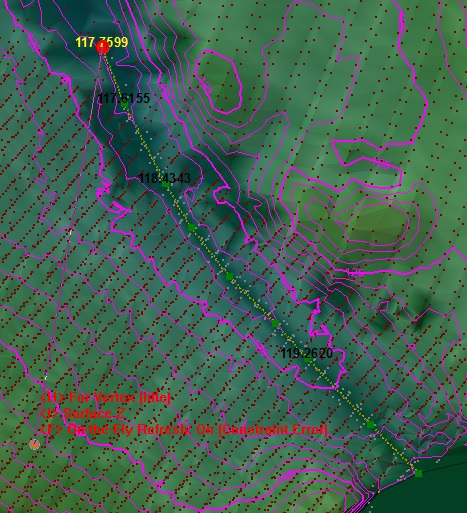 In the example illustration above, the downstream constraint algorithm produced an error when conforming the digitized line to the surface taking into account the z lock positions (i.e., assigned elevations in yellow, and black on the screen). The vertex producing the error is highlighted by the red circle. Upon inspection of the z lock values, you will see that the last digitized vertex is higher than the previous z lock position creating an unsolvable situation for the algorithm. Using the 'D' key on the current z lock position (i.e., designated in yellow) will lower that elevation of that vertex allowing the algorithm to complete the conforming criteria. Lowering the z lock position will refresh the surface and allow you to see the lowered surface as you decrease the elevation. Raising and lowering z lock positions are discussed in more detail below in the discussion of Locking Z Values. Locking Z Values ('L' Key) While digitizing breaklines, the user may override the current conflation task's method for calculating an elevation by assigning an elevation manually over the entire feature (i.e., constant), or for individual vertices. When Z Locks is turned on information about the current state and settings being used is displayed at the position of the cursor. The following options/keys can be used when the Z Lock option is turned on. As Constant and For Vertex Z Lock Values ('H' Key)
- As a prerequisite to using the LP360 Sketch tool, make sure you have started an editing session from the ArcGIS Editor toolbar.
- Select Create Features within ArcGIS.
- Select the Target dataset to digitize features.
- Select your desired active "Conflate Task" from the LP360 Digitize Breaklines toolbar.
- Now you may select the LP360 sketch tool and begin digitizing features.
- Digitize at least one vertex before using the advanced keyboard or mouse options outlined below.
To turn on the integration with the profile, the user must press the "P" key while using the sketch tool. Once the sketch geometry has at least one vertex, the profile will then be placed perpendicular to the direction of the rubber band segment in the sketch geometry. The cursor location is displayed as a vertical white line within the profile viewer. To disable the profile tracking, press the "P' key again. If the profile viewer is not open when pressing the "P" key, it will automatically open the profile viewer (Note: some adjustment of the profile size may need to be made). To freeze the location of the profile and slide the cursor into a channel or on top of a bank, press the "S" key to toggle the sliding state of the sketch tool. When activated, sliding will freeze the profile and allow the user to slide the cursor along the profile. Sliding is deactivated upon pressing "S" again or left clicking in the map to commit the vertex to the sketch geometry. The following illustrates the use of the slide function to freeze the profile and to slide the cursor into the channel. On-the-Fly Refresh While Digitizing ('F' Key) The LIDAR surface can be refreshed as the user digitizes a proposed breakline by pressing the 'F' key to toggle the on-the-fly refresh option. The on-the-fly refresh of the surface while digitizing can be useful in order to visualize the surface before committing changes to the LIDAR and feature databases. The following shows an example of using the on-the-fly refresh during the creation of a flat water body polygon. In the example above the user selected an on-the-fly refresh property to define the elevation that was used for the polygon during digitizing. The on-the-fly refresh setting may also be used with conflation methods such as downstream constraints for creating hydrology centerline features. The example below uses a combination of z locks (see discussion the Z Lock Option; 'L' key) and the on-the-fly refresh to visualize the surface before committing the centerline to the database. In the example illustration above, the downstream constraint algorithm produced an error when conforming the digitized line to the surface taking into account the z lock positions (i.e., assigned elevations in yellow, and black on the screen). The vertex producing the error is highlighted by the red circle. Upon inspection of the z lock values, you will see that the last digitized vertex is higher than the previous z lock position creating an unsolvable situation for the algorithm. Using the 'D' key on the current z lock position (i.e., designated in yellow) will lower that elevation of that vertex allowing the algorithm to complete the conforming criteria. Lowering the z lock position will refresh the surface and allow you to see the lowered surface as you decrease the elevation. Raising and lowering z lock positions are discussed in more detail below in the discussion of Locking Z Values. Locking Z Values ('L' Key) While digitizing breaklines, the user may override the current conflation task's method for calculating an elevation by assigning an elevation manually over the entire feature (i.e., constant), or for individual vertices. When Z Locks is turned on information about the current state and settings being used is displayed at the position of the cursor. The following options/keys can be used when the Z Lock option is turned on. As Constant and For Vertex Z Lock Values ('H' Key) - Constant Values: If you are using the 'As Constant' setting the z value that is displayed with the cursor location is the z value that will be used for the entire feature.
- As Vertex Values: As vertex values allow the user to assign elevations for specific vertices within the digitized feature. Regardless of the conflation method that is used by the active conflation task, the elevations assigned to the vertices will not be modified. Assigned elevations are displayed beside the vertices. If the elevation is displayed in yellow it is the current z lock position and all subsequent operations that work on the current z lock position will modify that elevation (e.g., R, U, D keys). Elevations for all other z lock positions are displayed in black.
- Surface Z: obtains the z value from the LIDAR surface.
- Lowest Z: obtains the lowest z value of the points within the current snapping tolerance.
- Highest Z: obtains the highest z value of the points within the current snapping tolerance
- Average Z: obtains the average z value of the points within the current snapping tolerance.
- Closest Z: obtains the z value from the closest point.
- From the Options button on the LP360 Digitize Toolbar, left-click the Z Increment Value Command.
- Input a new Z Increment Value into the dialog. The units are in the vertical units of the point cloud data.
- Press Enter to commit the new value or the 'X' icon in the upper right hand side of the dialog to cancel.
- Make sure you have access to an LP360 Standard license or higher
- The sketch will not complete if:
- Files are not open for read/write and the conflate task is set to reclassify
- Conflicting user z locks with conflate task
- The sketch will not have z values if the the ArcGIS sketch tool is used instead of the LP360 sketch tool
- Make all modifications (right-click menu options) to elevation values before sketch is finished
- Once a sketch is completed it cannot be edited with the creation tools
Comments
0 comments
Please sign in to leave a comment.